BLOG
ブログ
Est. 2025
Make Your Links Pop with OG Tags
Ever shared a link on social media and it looked boring? Just a plain URL with no preview image or description? That's where Open Graph tags come to the rescue. In this post, we'll dive into what Open Graph tags are, why they matter, and how to implement them to make your links stand out on social platforms. ## What Are Open Graph Tags? Open Graph (OG) tags are meta tags used in the `<head>` section of a webpage to control how content appears when shared on social media platforms like Facebook, Twitter, or LinkedIn. These tags allow us to specify titles, descriptions, images, etc, ensuring a visually appealing and informative preview when links are shared. ## Why Are OG Tags Important? OG tags play a crucial role in optimizing social media sharing. Here’s why they matter: - **Better Visibility**: Properly configured OG tags make shared links more visually appealing and engaging. - **Higher Click-Through Rates (CTR)**: A compelling title and eye-catching image encourage more users to click. - **Brand Consistency**: They ensure that the right title, description, and image are shown consistently across different platforms. - **SEO Benefits**: While OG tags don’t directly impact rankings, they boost social engagement, which can indirectly improve SEO. ## Implementing OG Tags in Next.js If you’re using the pages directory in Next.js, you can add OG tags inside the `<Head>` component from next/head. ```tsx import Head from "next/head"; export default function HomePage() { return ( <> <Head> <title>Leonard Tarigan</title> <meta property="og:title" content="Leonard Tarigan - Software Dev" /> <meta property="og:description" content="Bring your ideas to life!" /> <meta property="og:image" content="https://example.com/og-image.jpg" /> <meta property="og:url" content="https://example.com" /> <meta property="og:type" content="website" /> </Head> <main> <h1>Welcome to My Website</h1> </main> </> ); } ``` Or if you’re using the new app directory introduced in Next.js 13, you can define OG metadata using the metadata object in a layout or page file. ```tsx import type { Metadata } from "next"; export const metadata: Metadata = { title: "Leonard Tarigan", openGraph: { title: "Leonard Tarigan", description: "Passionate software developer. Let's bring your ideas to life!", images: ["https://example.com/og-image.jpg"], url: "https://example.com", type: "website", }, }; ``` ## Implementing OG Tags in Nuxt.js In Nuxt.js, we can utlize the built-in `useHead` composable to define meta tags, including OG tags. ```vue <script setup lang="ts"> useHead({ title: "Leonard Tarigan - Software Dev", meta: [ { property: "og:title", content: "Leonard Tarigan" }, { property: "og:description", content: "Passionate software developer. Let's bring your ideas to life!", }, { property: "og:image", content: "https://example.com/og-image.jpg" }, { property: "og:url", content: "https://example.com" }, { property: "og:type", content: "website" }, ], }); </script> ``` Alternatively, you can use `useSeoMeta` that lets you define your meta tags as a flat object with full TypeScript support. ```vue <script setup lang="ts"> useSeoMeta({ title: "Leonard Tarigan", description: "Passionate software developer. Let's bring your ideas to life!", ogTitle: "Leonard Tarigan - Software Dev", ogDescription: "Bring your ideas to life!", ogImage: "https://example.com/og-image.jpg", ogUrl: "https://example.com", ogType: "website", }); </script> ``` ## Checking Your Website’s OG Tags You can check your website’s existing Open Graph metadata using [opengraph.xyz](https://opengraph.xyz). This website allows you to preview how your webpage appears when shared and helps identify any missing or incorrect OG tags. 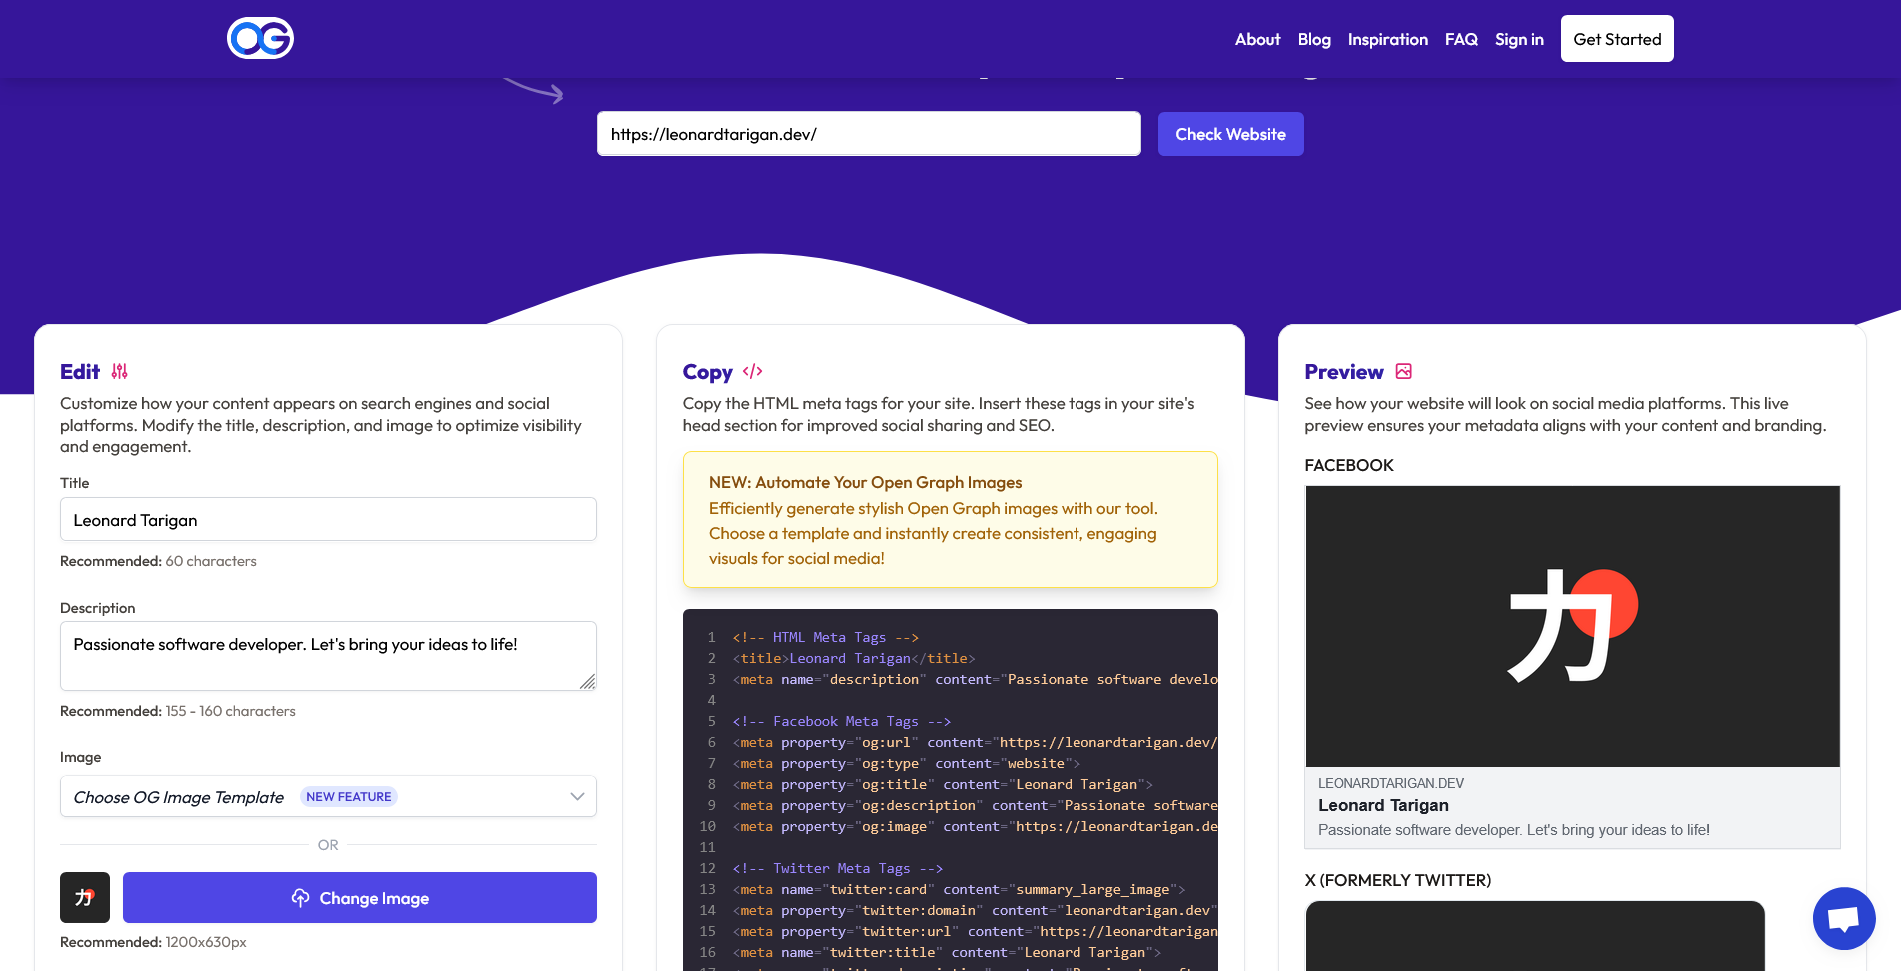 ## Conclusion Open Graph tags are a simple but powerful way to enhance your website’s presence on social media. They make your shared links more engaging, increase user interaction, and help maintain brand consistency. By setting up OG tags properly, you’ll ensure your content always looks polished when shared across the internet.
14 days ago

Debounce for Better Input Performance
Have you ever encountered a situation where a user’s rapid input, like typing in a search bar, caused your app to perform poorly or make too many unnecessary requests? This is where debouncing comes to the rescue. In this post, we’ll explore what debouncing is, why it’s useful, and how you can implement it in your projects. ## What is Debouncing? Debouncing is a programming technique used to ensure that a function is only executed after a certain amount of time has passed since it was last called. It’s particularly useful for optimizing performance in scenarios where a function might be triggered repeatedly in a short period, such as: - **Search input**: When a user types quickly, we don’t want to send a request for every keystroke. - **Window resizing**: We might want to recalculate layouts only after the user has finished resizing the window. Without debouncing, these actions could lead to performance issues, unnecessary API calls, or a poor user experience. ## How Does Debouncing Work? The idea behind debouncing is simple. Instead of executing a function immediately, we wait for a specified amount of time (e.g., 300ms) to see if the function is called again. If it is, we reset the timer. The function only executes when the timer completes without interruption. Here’s a simple analogy. Imagine you’re waiting for someone to stop talking before you respond. If they keep interrupting, you keep waiting. Only when they’ve stopped talking for a while do you finally respond. ## Search Input Problem Let's take search input as an example case. Suppose you have a search bar in your app, and with each keystroke, it triggers an API call to fetch some data based on the input. Sounds straightforward, right? ```tsx export default function DemoApp() { const fetchSearchResult = (keyword: string) => { console.log(`API call for input: ${input}`); }; return ( <div className="App"> <h1>Debouncing Demo</h1> <input onChange={(e) => fetchSearchResult(e.target.value)} /> </div> ); } ``` But what happens when your users type fast or make frequent changes? Without debouncing, every keystroke fires off an API request immediately. So, if you type "hello," it triggers five separate API calls, one for each letter. ```console API call for input: h API call for input: he API call for input: hel API call for input: hell API call for input: hello ``` This approach of making API calls for every single keystroke is inefficient and wasteful. In reality, we don't need or might not want to fetch results for partial words like "h", "he", or "hel". We only want to search for the complete term "hello". Making all these intermediate requests not only puts unnecessary load on our server but can also lead to a condition where results from an earlier request arrive after more recent ones. What we really want is to wait until the user has finished typing (or at least paused briefly) before making the API call. This is exactly where debouncing comes in handy. ## Search Input After Debouncing To simplify the process of debouncing, we can use the [debounce package](https://npmjs.com/package/debounce) from npm. It's a handy tool that streamlines the implementation. The `debounce` function takes two main parameters: 1. **A callback function**: This is the function you want to delay executing 2. **Delay time in milliseconds**: Specifies how long to wait after the last function call before executing In this second code snippet, `fetchSearchResult` is wrapped with the `debounce` function, which delays the API call by 1000 milliseconds (1 second) after the last input change. ```tsx import debounce from "debounce"; export default function DemoApp() { const fetchSearchResult = debounce((keyword: string) => { console.log(`API call for input: ${input}`); }, 1000); return ( <div className="App"> <h1>Debouncing Demo</h1> <input onChange={(e) => fetchSearchResult(e.target.value)} /> </div> ); } ``` Instead of firing off an API call for every character, we now wait for a second pause after the user stops typing. So, if you type "hello," it waits for you to finish typing or pause for one second before making the API request. ```console API call for input: hello ``` ## Conclusion Debouncing is a simple yet powerful technique that can significantly improve the performance and user experience of our applications. By delaying the execution of a function until a certain amount of time has passed, we can avoid unnecessary computations, API calls, or other resource-intensive operations. It’s a small change that can make a big difference.
15 days ago

Mastering The Amend Flag
Have you ever made a commit, only to realize you forgot to include some files, mistyped a message, or wished you could make a quick edit without adding a new commit? This is where the `git commit --amend` command shines. The `--amend` option allows you to modify the last commit, saving you from creating a new one just to fix a minor mistake. In this post, we’ll explore how to use the amend flag, its benefits, and when to use it (and when not to). ## Why Use The Amend Flag? When working with Git, commits serve as important snapshots of your project. But what if your commit message has a typo, or you forgot to add a crucial file? Rather than cluttering your commit history with fixes like "forgot this file" or "typo correction," you can amend the last commit to make it cleaner and more cohesive. Common use cases: - **Fixing a Typo in a Commit Message**: You made a commit but realized there's a typo in the message. - **Adding or Removing Files**: Forgot to include a file in the commit or accidentally included the wrong one. - **Updating Commit Content**: Made a minor change to the code that fits better in the last commit than a new one. ## How to Use The Amend Flag Using the amend flag is straightforward. Let’s go through a few scenarios. ### 1. Amending a Commit Message If you only want to change the last commit message, use: ```bash git commit --amend -m "New commit message" ``` This command opens the editor (or directly updates the message if you use the `-m` flag) where you can edit your commit message without affecting any code changes. ### 2. Adding New Changes to the Last Commit If you have uncommitted changes that should be part of the last commit, stage those changes with `git add`, then run: ```bash git commit --amend -m "New commit message" ``` ## Important Considerations While the amend flag is useful, there are some things to keep in mind: - **Only Amend Local Commits**: Amending is safe when you haven’t pushed the commit to a remote branch yet. If you amend a commit that’s already pushed, it can cause issues for others pulling from the same branch. - **Creating a New Commit Hash**: When you amend, Git creates a new commit with a new hash, even if the changes are minimal. This is why amending is best used for commits that haven’t been shared yet. ## When Not to Use The Amend Flag If your commit has already been pushed to a shared branch, amending it can complicate the history for others who’ve pulled the commit. In these cases, it’s better to create a new commit with corrections.
a month ago